
Kintsugi Tutorial

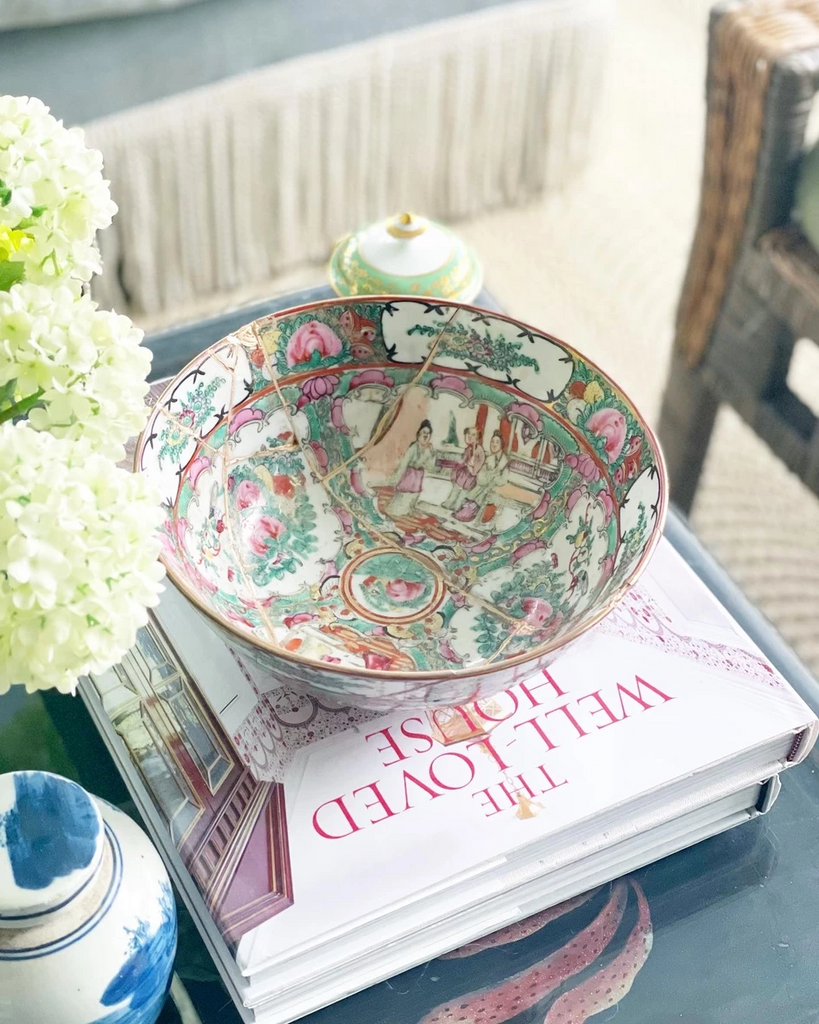
Two years ago one of my late grandmother's Rose Medallion bowl broke. Something I always had on display, suddenly into 22 pieces. I saved all the pieces because I couldn't stand to throw it away. I came across the ancient Japanese art of Kintsugi, and decided to buy a kit.
Kintsugi is a centuries old method of repairing broken pottery by mending the pieces together using a series of steps that require lacquer and gold dust. The fascinating part of Kintsugi is that once your piece has been repaired, it doesn't become new again. It becomes something entirely different, but somehow better. The breaks become appreciated, rather than something you are trying to hide. The journey of fixing this bowl (which took about 2 weeks) was very healing in many ways. We can apply the concept of Kintsugi to many aspects of our life.
Here is the kit I purchased, which I recommend. There are also beginner kits which only come with one product. Depending on your project and journey, choose accordingly.

Step One
Gather all the pieces and reimagine them together. Do you have them all or are you missing some? If you have them all, great-you are like me. If not, the kit comes with directions on how to recreate the missing pieces.

Step Two
Make the Mugi-Urushi by combining one to one ratio of cake flour and tap water. Once it becomes sticky, add the Pure Urushi to the mix until sticky and thorough. Be sure to wear gloves because this part gets messy. Apply the Mugi-Urushi with the provided spatula. I applied all the pieces together at once but if I wanted to perfect the process, I could have broken this up into stages to ensure a seamless application. Once the pieces are put together, wipe the access clean with the stick given in the kit. And wipe with a cloth so that you have less work cleaning it later. I should have spent more time on this part.


Step Three
Seal the cracks with the provided tape for added adhesion while it dries. I taped every crack closed so it would stay together.
Step Four
Create a box called a "Muro". Your piece will sit in here for roughly a week. This drying cabinet will have a damp towel underneath, with sticks so that the pieces can sit inside without touching the towel.

Step Five
When your piece is ready to remove from the box, you can begin to remove the tape and see how it held up. I took a cloth with turpentine and smoothed out the excess, scratching off little bits that somehow got all over the place. Then I sanded down the cracks so that they were flat, with the provided sandpaper. This part took me about an hour and the more meticulous you are, the better it will come out.


Step Six
I added a small amount of the Neri Bengara to a paper plate and applied it to the cracks. This was a redish color paint that makes the cracks sticky again so the gold powder would later adhere. I painted over all the cracks carefully with a fine paint brush. Any excess or mistakes can be wiped away. Wear gloves for this step as the Neri Bengara stains your skin (oops).

Step Seven
After waiting about one hour for the Neri Bengara to maintain its stickiness, it is time to add the gold powder to the lines. They gave two colors in the kit to choose from, alongside a silk cotton ball. I dipped the silk cotton ball into the powder I choose and delicately pressed it onto the painted lines of the bowl. I went over each spot two or three times to make sure it was covered, then wiped away the excess with a brush, being careful not the touch the lacquered lines.

Step Eight
Place your piece back into the Muro box for an additional week, making sure the cloth stays damp. When it is time to remove your finished piece you can continue to wipe away any excess with a cloth (I had to really work at this part because it was caked in pretty good!). It is recommended that you don't use the piece for 4 weeks but for me, it's decor so I kept it out.
TIPS
Spend the time removing any excess but because you have the cracks filled entirely
Don't skimp on the sanding process, it will ensure you have smooth lines
Be patient and enjoy the process
Hope you liked this segment and I hope you will try it someday, either the version I used or a simpler one. Whichever method you choose, I hope it creates a fun and meaningful process for you.
Leave a comment